Saturday, December 29, 2012

Pork Belly

Always wanted to figure out something to do with pork belly, besides makin' bacon with it, or at least lardons.

The goal was to make this:


Having just bought a stove top smoker, had to use that. However, with all the fat that is in a pork belly, figured that a long, slow roasting would be good. Also, knowing that pork dries out in a hurry when cooked, figured that it should start with a brine.

So, into the brining bucket with 3/4 gallons of water and 3/4 cup of kosher salt. Brined it for a couple of hours.
Before brining, did cut through the fat on the top, placing slits every half an inch. 

After the brining, rubbed butter and kosher salt all over it, working it well into the slits. Then, put fresh ground pepper over as well and placed it in the stove top smoker.


Then, out to the outdoor kitchen (gotta love Texas in December!) and wait for the wisp of smoke before sealing the top. Due to the size of the pork belly (musta been a Texas hog), had to use aluminum foil instead of the sliding lid.
Smoked it for 30 minutes. Next time will go for 45.

Then, into the indoor kitchen where a bed of thick-sliced onion on a lined baking sheet was waiting. 


For smoking (outdoor kitchen) the fat side was to the bottom. For the indoor treatment, the fat side goes to the top! Also, I poured a cup of water in the pan.
Then, into a preheated 325 F oven for 3 - 3 1/2 hours, until the cracklings are hard. Check every hour to be sure that there is still water. Want water in the pan, however, do not want the pork belly touching the water. The water keeps the meat moist, but, do not want to boil the meat.

At the end, it looks like this.


I then sliced the cracklings off the top. and let the meat rest until sliced. While the meat was resting, decided to take the crackling, chop it all up, throw it into a frying pan to sweat out the rest of the fat. Then, dried the crackings on paper towel and used the fat to pan roast some asparagus.

Also, made grits with buttermilk. This gives a little tartness to the grits. So, when assembled, placed the grits on the bottom, then the sliced pork belly, then the asparagus, then the cracklings and then drizzled some honey on top.

I will do this again!


Smoked Halibut

Bought a stove top smoker! Smoked a halibut fillet for the first attempt, using hickory chips. Turned out fabulous! Just lightly salted and pepper and into the smoker for 25 minutes and this is what I got. Served over sauerkraut:


Saturday, December 15, 2012

Babette's Feast - #1 entry


This is another way to present the dish.


The objective was to get the puff pastry dough down for the quails in coffins. So, might as well do a simple recipe on the quail and side. The side was pan grilled asparagus and red peppers. Here's the presentation. In the future, I gotta use either smaller quail (these are Texas size quail) or make the coffin bigger.


So, for the puff pastry dough, here are the ingredients:


Those are lemons there, not grapefruits. A friend gave me a bunch of Meyer lemons. They have great flavor. So, I juiced them all, made ice cubes of the juice so that there are small quantities available when needed.

3 cups of all-purpose flour
1 1/2 tablespoons sugar
1 1/2 teaspoons salt
2 teaspoons lemon juice
1/4 cup vodka (yes, vodka), chilled,
1/2 cup water, chilled
1/4 cup water, chilled

3 sticks (24 tablespoons) unsalted butter, chilled
2 tablespoons all-purpose flour

First thing is to combine the flour, sugar and salt. This is done in the food processor. Just put all those dry ingredients in it and pulse it for about 5 to 10 seconds.

Now, with the processor running, add the lemon juice, the vodka and the 1/2 cup of water in a slow and steady stream. Add the remaining 1/4 cup water as needed, 1 tablespoon at a time, until the dough comes together and no flour bits remain.

Turn the dough onto a sheet of plastic wrap and flatten into 6-inch square. Wrap tightly in plastic and refrigerate for about an hour.

On to the BUTTER SQUARE!

Lay butter sticks side by side on a sheet of parchment paper.


Now, dust this with the two tablespoons of flour.
Now place a second piece of parchment paper on top and gently pound the butter with your palms or with a rolling pin to softened it and incorporate the flour and roll it into an 8-inch square. Should look like:


Wrap the square in plastic wrap and refrigerate until chilled, about an hour.

After chilling the dough and butter square, roll the chilled dough into an 11-inch square on a lightly floured surface. Place the chilled butter square diagonally in the center, like this:
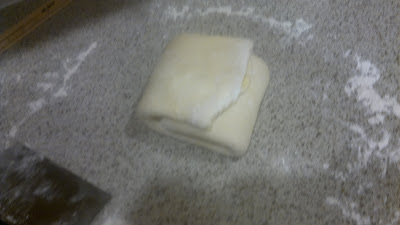
Fold corners of dough up over the butter square so that corners meet in the middle and pinch the dough seams to seal.. Using rolling pin, gently tap dough, starting from center and working outward, until square becomes larger and butter begins to soften. Gently roll dough into 14-inch square, dusting with extra flour as needed to prevent sticking. This should then look like this: 


Now fold the dough into thirds like a business letter, then fold the rectangle in thirds to form a square, like this:

Wrap dough in plastic and let rest in refrigerator for 2 hours.

Repeat this twice (yes, twice!). That is, roll it out on a floured surface into a 14 inch square, fold like a business letter and then fold into a square and then wrap in plastic and then refrigerate for 2 hours. Then repeat.

This amount of puff pastry dough should be enough for 10 coffins. So, I froze half of it by wrapping in plastic and then in aluminum foil. Should keep about six months.

To make the coffins, first preheat the oven to 400 degrees.

Roll out the dough on a floured surface, large enough to cut out the coffins. I first tried a 5-inch circle for each coffin. Next time it will be a 6-inch or 7-inch circle. (Texas quail are big!)

Cut out these large circles and place on a parchment paper lined baking sheet.

Now, cut a smaller circle (I tried a 3-inch in the 5-inch circle) but do not cut all the way through! You want to make a lid for the coffin.

Bake for 22 minutes or until puffed and golden. Carefully lift out the lid to create the coffin and a lid. Place on a wire rack to cool.


This entry is focused on the puff pastry. Nailed it! Just need to make them bigger.

Now, to round things out, here's what I did for the quail and the sauce.

First the quail - like I said, a simple recipe. I will try the Babette's feast recipe for it later. What I did what dry each quail and then stuffed with apple slices. I then coated each with dijon mustard and seasoned with salt and pepper. Then, into the stove top smoker for 25 minutes. Then, into the broiler for 4 minutes to crisp up the skin.

For the sauce - another simple recipe. Took a good handful (about 1/2 cup) of golden raisins and put them in a sauce pan with a couple of teaspoons of lemon juice and about 8 ounces of raspberry jelly. Heated that until it started to boil, turned off the heat and then added 1/2 stick (1/4 cup) of butter that was cut up into 1/2-inch cubes.

It was fantastic.

Saturday, November 24, 2012

Horseradish

Homemade Horseradish is the best! No preservatives, just horseradish, water and drops of vinegar. So, what does horseradish looks like?


So, peel it, chop off the dry ends and chop it into chunks.

Then, into the food processor, add a couple of tablespoons of water,.and turn it on. 


Grind it all up. Add a tablespoon or two of vinegar anywhere from immediately to a few minutes later. The vinegar freezes the heat, so, the longer you wait, the hotter it will be.

Now, remember, this is horseradish - powerful stuff!! Keep your eyes and nose away until the vinegar has been added. Even then, be careful!!!!

Here it is all contained:

To make a great sauce for roast beef or corned beef or anything else you want to have, take equal amounts of horseradish and heavy cream. Lightly whip the cream so that it thickens but before it gets to the soft peaks stage. Blend in the horseradish and refrigerate for at least 30 minutes. 

Enjoy!!


Sunday, October 28, 2012

Roasted Smashed Potatoes

Took only three hours and two attempts to get this down! Goes great with beer, especially an Oktoberfest! It was a cold day here in Houston, so, instead of turning on the heater, decided to perfect this recipe. That way we would not mind the oven being at 500. Of course, it did burn off everything in the oven and set off the smoke alarms, so, we had to open the windows!

What you need:

2 pounds of small red potatoes (these should be 1 1/2 to 2 inches in diameter, nothing larger!)
6 tablespoons extra-virgin olive oil
1 teaspoon minced fresh thyme
   Kosher salt and pepper

Start by adjusting the oven racks to the top and lowest positions and heat the oven to 500 degrees.

Arrange potatoes on rimmed baking sheet, pour 3/4 cup water into baking sheet, and wrap tightly with aluminum foil.

Cook on lowest rack until paring knife or skewer slips n and out of potatoes easily. Just poke right through the foil to test. This should take about 25 minutes.

Remove the foil and let cool for 10 minutes. This cooling allows the potatoes to be smashed without crumbling.


If there is any water remaining on the baking sheet, blot dry.

Drizzle 3 tablespoons of oil over the potatoes and roll to coat.

Space potatoes evenly on the baking sheet and either use a potato masher, or, another baking sheet, to flatten the potatoes until they are about 1/2 to 3/4 inches thick.


I prefer the masher as it leaves some great grooves.


Sprinkle with the thyme and season generously with salt and pepper. Then drizzle evenly with the remaining 3 tablespoons of oil.

Roast potatoes on the top rack for 15 minutes.

Transfer potatoes to lowest rack and continue to roast until well browned and the undersides are crisp. This could take as little as 4 minutes or as long as 30 minutes. (The first time I tried it, I went 20 minutes - way, way too long! Got burnt edges. I found 4 minutes was much better timing.)


Fluffy on the inside, crispy on the outside!


Saturday, September 22, 2012

Potato-crusted halibut w/mushrooms and herb cream

This is from the Bluestem cookbook that my sister (whom I love to antagonize) gave me. Well, the Bluestem was the starting point. Had to substitute some ingredients, as noted. I made this for two, halving the recipe that follows. I am also giving some notes along the way.

So, for four, here are the ingredients:

Herb Cream
1 cup heavy cream
4 egg yolks
2 cups loosely packed fresh chervil
2 cups loosely packed fresh flat-leaf parsley
2 tablespoons fresh thyme leaves
Salt and freshly ground white pepper

Here's the substitutes on the herb cream that I used. First, chervil was not available, so, I used curly leaf parsley. Also, instead of white pepper, I always like to use crushed red chili peppers.

Mushrooms
2 tablespoons unsalted butter
8 ounces porcini mushrooms, trimmed and halved lengthwise
2 large shallots, finely copped
2 cloves garlic, chopped

Ok, so, fresh porcini mushrooms are hard to find. The book suggests that if you can't find porcini, use cremini. Sorry, I substituted shitake.

Vinaigrette
1 tablespoon plus 1 teaspoon banyuls vinegar
1 tablespoon extra-virgin olive oil
Pinch of salt

Ok, banyuls turns out to be a brand name. Not carried around here. So, use a sherry vinegar.

Fish
1 1/2 pounds russet potatoes, peeled
4 (6 ounce) halibut fillets
Salt and freshly ground white pepper
1/4 cup vegetable oil

Ok, 1 1/2 pounds of potatoes, I found out, is too much. Can do it with 1 pound. Also, again, used crushed red chili peppers. Also used olive oil.

To prepare.

First, make the herb cream: Bring the cream to a simmer in a saucepan. Put the egg yolks into a blender. With the blender running, drizzle in the hot cream to temper the yolks. Let it emulsify and thicken. Add the chervil, parsley and thyme and puree until smooth. Season with salt and pepper. Keep warm until ready to serve.

I noticed that it would dry out on the stove while keeping warm. So, be sure to have some liquid (water, wine) on hand to keep the thickness correct.

Now the mushrooms. Heat the butter in a skillet over high heat. Sear the mushrooms, cut side down, for a couple of minutes, at the most, until browned. Add the shallots and garlic and continue cooking just until the shallots turn translucent. Remove from heat and cover to keep warm.

Make the vinaigrette. Whisk together the vinegar, olive oil and salt to make a vinaigrette. Set aside.

Prepare the fish. Grate the potato using a box grater. Gather the grated potato in a clean kitchen towel and squeeze all the liquid out. Transfer the grated potato to a bowl.

Preheat the oven to 375 F. Season the fish with salt and pepper.

Season the potato with salt and pepper. Divide the potato into the same number of fillets that you have. Smash the potato into rectangles that are a wee bit bigger than the fillets. Lay a fillet over each group of potato. Using a sharp knife, outline the perimeter of each fillet, trimming away the excess potato around the edges.

Heat the oil in a large, ovenproof saute pan over medium heat. When the oil is hot, carefully place the fish, potato side down, in the pan and cook until golden brown about 2 1/2 to 3+ minutes. Using a wide spatula, carefully flip the fish over. The potato crust should come cleanly away from the skillet and adhere to the fish. Transfer the skillet to the oven and roast the fish for 4 minutes.

Toss the mushroom mixture with the vinaigrette.

Spoon some herb cream onto each plate. Top the cream with a fillet. Divide the mushrooms among the plates and serve immediately.

Ok, now for the pictures!

Here's the ingredients.

Here's the yolks in the Vitamix, waiting for the warm cream!
And, here is the Vitamix after pureeing the cream. 

The herb cream, on the stove, keeping warm. Next time I will probably float some cream on top as well. Even though I had it covered, it thickened up and I had to add liquid to it.


 Here's the vinaigrette, the mushrooms, shallots/garlic and butter:


The grated potato, after the liquid had been squeezed out, along with the fish.


Sauteing the mushrooms!


And . . . here it is plated! Served with carrots, broccoli and beets. There are more than enough mushrooms. I figure what Bluestem lists for mushrooms could be for 8 not 4. Also, the herb cream could easily be for 16 servings! Don't need that much!


Fish Stock

All it takes to make fish stock is to add a fish carcass to the vegetables when you make a vegetable stock.

So, the ingredients are:

3 quarts plus 2 cups water
2 cups white wine
1/2 cup Champagne vinegar
1 large yellow onion, coarsely chopped
1 fennel bulb, including fronds, trimmed and coarsely chopped
1/2 celery stalk, coarsely chopped
1 head garlic, top third sliced off
1 leek, coarsely chopped
6 sprigs fresh tarragon
6 sprigs of fresh thyme
1 bay leave
1 tablespoon black peppercorns.

That is what you could use for a vegetable stock. Now add at least 2 pounds of fish bones and trimmings (fish heads and scrap pieces of fish) to the vegetable stock at the beginning, before the heat is put to the stock pot.

 Combine all the ingredients in a large stockpot. bring it to a simmer and then reduce the heat to low. Simmer, uncovered for 45 minutes.

Remove the pot from the heat and strain the stock through a fine-mesh sieve or cheesecloth into a heatproof container set in an ice bath. discard the solids. Cool the stock in the ice bath. Transfer chilled stock to airtight container(s). Refrigerate the stock until you are ready to use it. The stock can also be frozen for up to 2 months. 

Ok, so, here are the pictures! First, the ingredients (missing the fresh thyme):

Notice the fish on the left? The fish monger was having a sale on Alaskan king salmon today. So, bought a whole one and when he fillet it, I told him I wanted the whole fish. So, we got some great fillets along with a carcass!

Here is the carcass: 
Here's all the ingredients in the stockpot, prior to the heat: 


And here is the cheesecloth, over a strainer, over a bowl, over the ice bath, waiting to strain the stock:
Back to the stock! Here it is, just getting up to a simmer. The foam is the indicator that it is at a simmer.


And, here it is, 45 - 60 minutes later, ready to be strained:

And, here it is being strained! 


And, here is the strained stock, ready to be placed in air tight jars:


And here it is in the jars, still in the ice bath, cooling off, before the lids are placed on it and then into the freezer.
Actually, that wasn't all of it. I took two servings and placed it into a pan to heat up. Into that, I tossed some noodles, some cream that I had at a simmer, and some grated Parmesan cheese. That was lunch!


Thursday, September 20, 2012

Corned Beef

Easy to make at home. I use to cure the beef using a dry rub. Then, I learned how to do it in a brine.


For a 4 – 5 pound beef brisket, super trimmed. Cut off all the fat that can be cut off.
1     2 gallon ziplock bag
2     Quarts water
1     cup kosher or sea salt
½    cup brown sugar
1     cinnamon stick, broken into several pieces
1     tsp mustard seeds
1     tsp black peppercorns (cracked – smash with heavy pan)
8     whole cloves (cracked)
8     whole allspice berries (cracked)
12   whole juniper berries (cracked)
2     bay leaves, crumbled
½    tsp ground ginger
2     lbs ice

So, I started with a 10 lb brisket, shown here. Remember, if you also use a 10 pounder, the other ingredients must also be doubled.


For such a large brisket, it is easy to separate the two muscles (the grains are going in different directions anyway, so, when it is cooked and slice they need to be separate anyway, so, might as well do it now) and then trim the fat off so it looks like this.


Now, here are all of those spices!


Place the water into a large (6 – 8 quart minimum) stockpot along with salt, sugar, cinnamon stick, mustard seeds, peppercorns, cloves, allspice, juniper berries, bay leaves and ginger. Cook over high heat until salt and sugar have dissolved. Remove from heat and add ice. Stir until ice has melted. Allow to cool completely. Then, place in refrigerator and continue to cool to 45 degrees F. (or, in winter, cover pot and place outside!) Once cooled, place brisket in ziplock bag and add the brine. Seal and lay flat inside a container, cover and place in refrigerator at least 10 days. (2 weeks works!) Once a day, slosh the bag to be sure that the beef is completely covered and to stir up the brine.

So, with the 10 pounder of brisket, I use two bags, since I have doubled all the ingredients:


And here they are in a large ceramic bowl that goes in the refrigerator.


After 10 days (or at least 2 weeks, could be as long as 4 weeks) remove from brine and thoroughly rinse in cold water. Want to get all the brine out. Place in a container and fill with cold water and place in refrigerator overnight. 

Now comes cooking time! In addition to the cured meat, you need the following:

1     onion with four cloves stuck in it
1     large carrot, coarsely chopped
1     stalk celery, coarsely chopped
Herb bouquet: (8 sprigs of parsley, 2 cloves of unpeeled garlic, 1 tsp of dried thyme or 4 tsp of fresh thyme, 3 fresh bay leaves, all wrapped up in a washed piece of cheese cloth and tied.)


Tie brisket to hold it together while cooking. Place brisket into a pot just large enough to hold the meat, add the onion, carrot, celery and herb bouquet and cover with water by 2 inches. Set over high heat and bring to boil. Reduce heat to low, cover and simmer for 3 ½ hours or so until meat is fork tender. 

And it's done!

I like to serve it with steamed cabbage and some good beer.

Enjoy!