Saturday, May 18, 2013

Weaved Bacon Wrapped Stuffed Venison Loin

 
This was fun to do!

It all starts with takin' enough bacon to weave the wrappin'. Do this on plastic wrap so that it is easy to manipulate when wrappin' the stuff loin.
The first step in making a stuff loin is to take the venison loin, which should be about one inch thick and butterflying it. I happened to have two, so, I butterflied both:
Then, sprinkled with salt and pepper.

For the stuffing, I made croutons from pumpernickel bread and  decided to add in some of this stuff chopped up.
That is celery, a leek, garlic, and, yes, dark chocolate! (Yum, bacon and chocolate in the same item!!) Here they are, all chopped up and mixed up and ready for the loin! Of course, added some salt to the mixture as well.

So, with having two loins, I just spread some of the stuffing on top of one and then placed the other on top of the stuffing - sorta like a sandwich. Then, placed the stuffed loin on the weaved bacon and wrapped it and then used the plastic to form it into a loaf, like this:
Into the refrigerator for a few hours to let it rest and let it think it belongs in that shape.

Then, onto the rack for the stove-top smoker (that I use outside on my side burner).
Smoked it, using white oak, for half an hour, until the temperature of the meat was correct.

Then, under the broiler for some time, I think about 8 minutes or so, to crisp up the bacon. 


Then, let it rest 10 minutes before carving and serving. I made a green peppercorn, wine, demi-glace sauce (with scallions and garlic) for it.

Served it with pickled, roast cauliflower, baked spinach/scallions/garlic/parmigiano reggiano cheese, and cayenne julienne fries. Along with, of course, a Texas wine!

Enjoy!


Wednesday, April 17, 2013

Babette's Feast - Dessert!


KUGLEHOPF


Though it originated in Austria, Kuglehopf is a sweet, raisin-filled yeast bread-cake that has become a specialty of the Alsace region of France, where it is often served for breakfast or brunch.

This is what Babette served for dessert with a side of some raspberries.


4 cups flour, sifted before measuring
1 cup milk
1 cup butter
1 cup seedless golden raisins
3/4 cup sugar
5 eggs
1/3 cup blanched almonds
1/4 cup rum
3 packages active dry yeast
1 tsp salt
1/2 tsp lemon rind, grated


Let all the ingredients come to room temperature.


Scald the milk and then let cool to just lukewarm. Pour the milk over the yeast and after the yeast is dissolved beat in 1 cup of the sifted flour. Set this sponge to rise in a warm place until doubled in bulk (about 1 hour).


Beat the butter until it is soft and then gradually sift in the sugar, blending until the mixture is light and creamy. One at a time beat in the eggs and then beat in the salt. Add the sponge, the remaining flour, the raisins and lemon rind. Beat the mixture until smooth and elastic.

The recipe calls for a 9” tube pan, something that I do not own. I do have a 10” spring form pan an various size ramekins. So, time to engineer a pan! (Next time the ramekin will be turned upside down.)

Butter the pan. Then spread the blanched almonds in the bottom of the pan. On top of the almonds spread the batter and let stand until again nearly doubled in bulk. 


Bake the cake in an oven that has been preheated to 350 for 50 - 60 minutes (to tell if the cakes are done, insert a sharp knife. If the knife comes out clean, the cake is done).Check the cake after about 30 minutes.  If the cake browns on the top too quickly, cover with aluminum foil. 


Let the cake cool completely before removing from the pan.


Just before serving sprinkle the cake with the rum, coat generously with chantilly cream and, if desired, decorate with glazed fruits. Serve with well chilled Champagne. 

To make Chantilly cream, use 1 cup of heavy whipping cream, 1 tablespoon of powdered sugar and 1/2 teaspoon of vanilla extract. Pour the heavy cream into a chilled bowl, add the vanilla extract and start whipping, preferably by hand. Gradually add the sugar during the whipping process. Whip until stiff.

Saturday, February 9, 2013

Macaroni and Cheese


Today was all about experimenting with the classic macaroni and cheese. I wanted to explore the different flavors that can be had by using different cheeses. So, starting with the classics, Monterey Jack for the creamy texture and sharp cheddar for the great taste, I decided to mix things up for four different combinations:

Cheese
Classic
#1
#2
#3
Jack
4
4
4
4
Cheddar
4
2
2
1
Jarlsburg
2
1
1
Parmesan
1
1
Blu Cheese
1

So, for every pound of dry macaroni, that is the number of ounces of cheese that was used. Of course, a pound of dry macaroni is going to produce a bunch of servings, so, each trial only got ¼ pound of macaroni. (divide the above by 4).

Whole wheat pasta will give it a nice nutty flavor.

Best to under cook the pasta to one minute under the shortest time on the package.  It will finish cooking when it is added to the sauce and baked.


Macaroni and cheese, to me, has to be baked, or broiled, in the oven to get a good crust on top. That is the way I like it. Also, to help to ensure that it doesn't dry out, it gets most of the cooking done on the stove top where it is easier to keep an eye on it and keep it all stirred up.
I truly prefer the whole milk, however, the low fat stuff could also work.
Also, the bechamel sauce truly helps the cheeses to melt and forms a great, creamy sauce.To make macaroni and cheese, adjust the oven rack to the lower middle position and heat broiler. Bring a gallon of water to boil in a large pot. Add one pound of elbow macaroni and one tablespoon of salt to the pot. When it comes back to a boil, cook for six minutes, stirring often, until tender and then drain the pasta.
Melt 5 tablespoons of butter in the now-empty pot over medium-high heat. Add 6 tablespoons of flour, 1-½ teaspoons dry mustard, ¼ teaspoons of cayenne pepper and 1 teaspoon of salt, whisking constantly and cook the mixture until it becomes fragrant and deepens in color, about one minute.

Gradually whisk in 5 cups of whole milk. Then, bring this to a boil while whisking constantly. Reduce heat to medium and simmer, whisking occasionally, until thickened, about 5 minutes. Remove from heat and slowly whisk in the cheeses until completely melted. Add the pasta and cook over medium-low heat, stirring constantly, until mixture is steaming and heated through, about 6 minutes.
Transfer mixture to ramekins that have been buttered. Sprinkle with Panko breadcrumbs. Broil until topping is deep golden brown, about 5 minutes. Allow to cool for 3 to 5 minutes, depending on the size of the ramekins, before serving.

Enjoy!
As to which tastes best . . . I will leave that up to you!

Monday, February 4, 2013

Babette's Feast #2


Beef Glace de Viande
This past weekend was about making demiglace. Actually, I ended up making beef glace de viande. This is one of the ingredients that is needed for the sauce for the quails in Babette’s Feast.

What’s the difference between demiglace and beef glace de viande?

Demiglace is actually any rich stock or broth that is reduced by half or three-quarters to enrich it – leaving it still a relatively thin liquid. Glace de viande is made the same way, but it is reduced by a factor of 8 – 10, has a thick, syrupy or paste-like consistency and is much richer.

Here’s how I made mine. Some folks would add cooked tomatoes or tomato paste. However, my wife can’t have those due to medical reasons. So, you won’t find any in this.

Ingredients:
5 – 6 lbs of beef bones. I was fortunate to find beef feet. Worked great.
1 lb or more of venison bones.
4 large onions (3 of which are quartered, 1 of which is chopped up for the mirepoix)
6 cloves garlic, unpeeled, cut in half and slightly crushed
6 stalks of celery, with leaves (4 stalks cut in 2 inch pieces, 2 chopped up for the mirepoix)
5 large carrots (3 cut in 2 inch pieces, 2 chopped up for the mirepoix)
1 bunch parsley
6 bay leaves
1 teaspoons of whole black peppercorns
1 bottle of red wine
½ teaspoon of thyme
4 ounces (1 stick) butter, clarified
4 tablespoons of flour
lardons

Set aside all the mirepoix ingredients for later. Divide the rest of the onions, celery and carrots in half.

Preheat the oven to 450 F. Make an herb bouquet by bundling the parsley, bay leaves, garlic and peppercorns in cheesecloth.

Spread the bones and half of the onions, celery and carrots in a single layer in a baking dish. Roast this in the oven, turning and basting several times with the accumulated fat, until nicely brown. This should take 40 to 50 minutes. At the end, it should look like this.


Transfer the bones and vegetables to the stock pot. Add the other vegetables and the herb bouquet. Drain off the fat from the baking dish and deglaze the pan with about a cup of water. Add the deglazed liquid to the stock pot. Add water to cover everything by about an inch. Bring all of this to a boil. Reduce to simmer and partially cover. The first couple of hours, skim off the scum that forms at the top. Simmer, simmer, simmer, for at least 12 – 16 hours. Want all the bone marrow to dissolve. When simmering over night, fully cover and reduce heat to as low as possible. In the morning, uncover, increase heat, bring to a boil and then reduce heat to simmer and partially cover until ready for the next step. When done, using tongs, remove the bones. The bones should look like this.


Strain the liquid through a colander. The veggies and bouquet should look like this.


Degrease. (note, the picture above shows some of the beef tallow (beef fat rendered) that was recovered in the degreasing process. Pour all the beef stock back into the stock pot. Add the bottle of wine, thyme, maybe some dried parsley, maybe a couple of more bay leaves to the stock pot.

Now, take the clarify butter and the flour and make a roux. To do this, blend the flour and the butter together in a sauce pan, stirring fairly continuously with a wooden spoon over moderately low heat for 10 to 15 minutes until it is a nice, even, walnut brown.

At the same time, cook the mirepoix ingredients. Do this by first heating up a frying pan, cook the lardons that have been sliced in ¼ inch thick pieces. Here’s a picture of the roux being cooked while the lardons are also being cooked.


Once the lardons have been crisped up, the fat should have come out. So, remove the lardons and cook the mirepoix ingredients in the fat until they are lightly brown. Here's a picture of the roux being cooked while the mirepoix is being cooked.
Here’s a picture of the mirepoix done and the roux just about done.


When the roux is ready, let it cool for two minutes and then add six cups of stock, slowly to it using a wire whip.

Scrape the mirepoix into the stock pot and deglaze the pan with some stock, adding the deglazed liquid to the stock pot. Add the roux to the stock pot as well.

Simmer for another 5 – 6 hours, partially covered. Then taste. Should have about 1 ½ to 2 gallons of stock. 

If you like the taste, strain out all the solids and degrease. Then pour the liquid back into the stock pot and start boiling it down. You want to end up with 2 ½ to 3 cups. Do this by bringing it to a rolling boil, uncovered, and removing any scum that forms on the surface. When it is a good, thick liquid, remove from heat.
Degrease again. Here’s a picture of the final liquid being degreased.


I then pour this into small muffin tins and freeze. Then, remove from the muffin tins and store in a ball jar in the freezer. These will keep a long time. When needed for a sauce, just take one out of the freezer.

Saturday, December 29, 2012

Pork Belly

Always wanted to figure out something to do with pork belly, besides makin' bacon with it, or at least lardons.

The goal was to make this:


Having just bought a stove top smoker, had to use that. However, with all the fat that is in a pork belly, figured that a long, slow roasting would be good. Also, knowing that pork dries out in a hurry when cooked, figured that it should start with a brine.

So, into the brining bucket with 3/4 gallons of water and 3/4 cup of kosher salt. Brined it for a couple of hours.
Before brining, did cut through the fat on the top, placing slits every half an inch. 

After the brining, rubbed butter and kosher salt all over it, working it well into the slits. Then, put fresh ground pepper over as well and placed it in the stove top smoker.


Then, out to the outdoor kitchen (gotta love Texas in December!) and wait for the wisp of smoke before sealing the top. Due to the size of the pork belly (musta been a Texas hog), had to use aluminum foil instead of the sliding lid.
Smoked it for 30 minutes. Next time will go for 45.

Then, into the indoor kitchen where a bed of thick-sliced onion on a lined baking sheet was waiting. 


For smoking (outdoor kitchen) the fat side was to the bottom. For the indoor treatment, the fat side goes to the top! Also, I poured a cup of water in the pan.
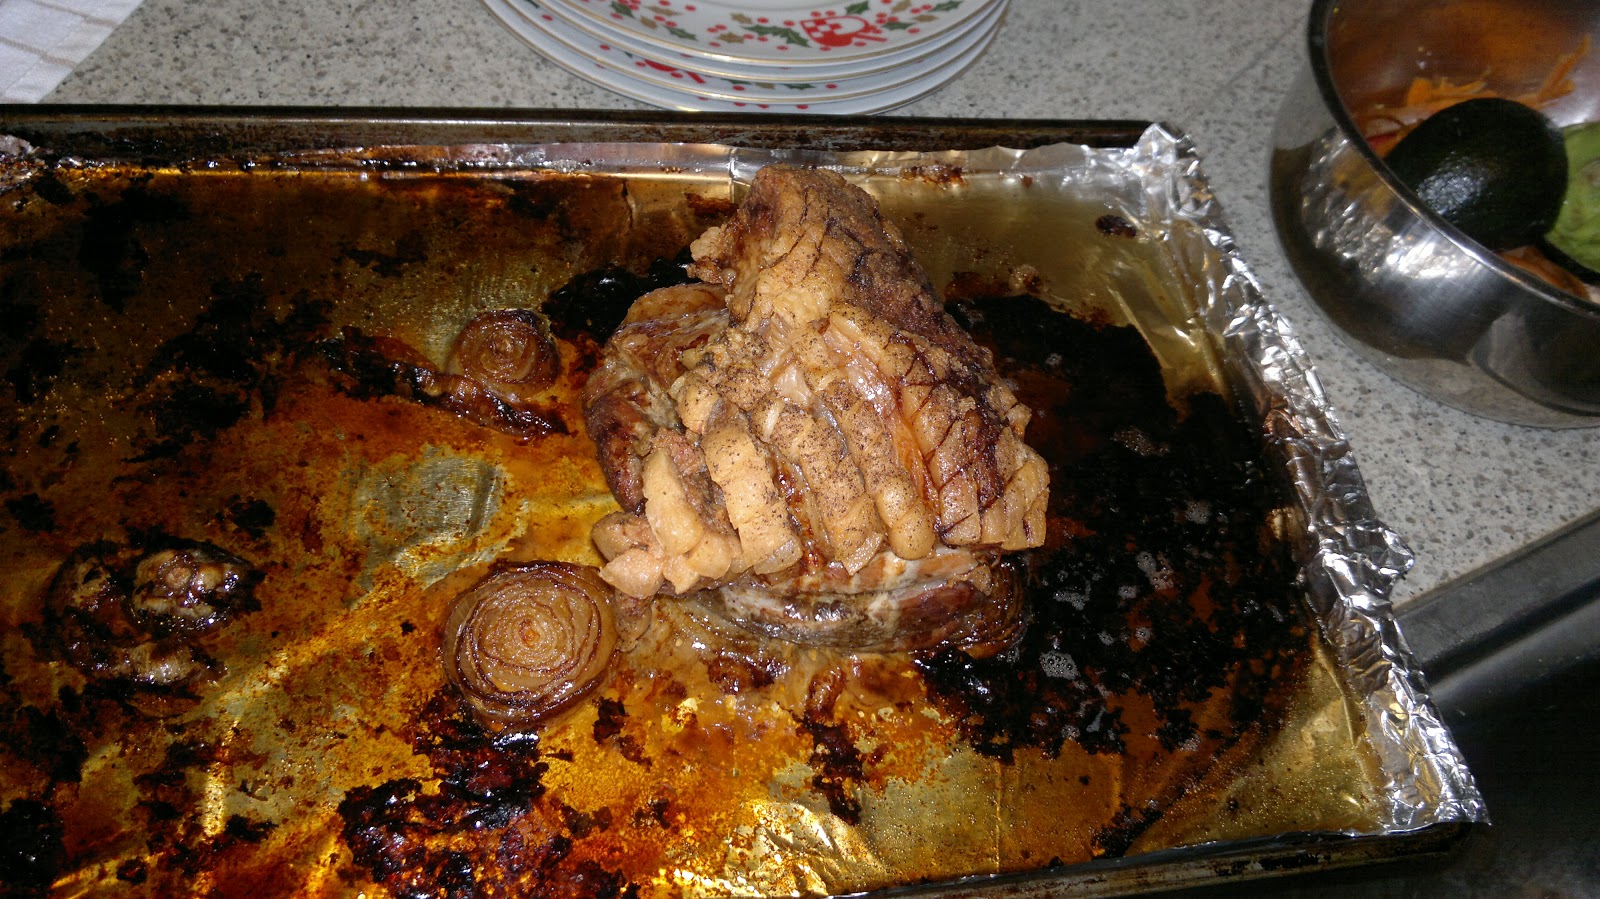
Then, into a preheated 325 F oven for 3 - 3 1/2 hours, until the cracklings are hard. Check every hour to be sure that there is still water. Want water in the pan, however, do not want the pork belly touching the water. The water keeps the meat moist, but, do not want to boil the meat.

At the end, it looks like this.


I then sliced the cracklings off the top. and let the meat rest until sliced. While the meat was resting, decided to take the crackling, chop it all up, throw it into a frying pan to sweat out the rest of the fat. Then, dried the crackings on paper towel and used the fat to pan roast some asparagus.

Also, made grits with buttermilk. This gives a little tartness to the grits. So, when assembled, placed the grits on the bottom, then the sliced pork belly, then the asparagus, then the cracklings and then drizzled some honey on top.

I will do this again!


Smoked Halibut

Bought a stove top smoker! Smoked a halibut fillet for the first attempt, using hickory chips. Turned out fabulous! Just lightly salted and pepper and into the smoker for 25 minutes and this is what I got. Served over sauerkraut:


Saturday, December 15, 2012

Babette's Feast - #1 entry


This is another way to present the dish.


The objective was to get the puff pastry dough down for the quails in coffins. So, might as well do a simple recipe on the quail and side. The side was pan grilled asparagus and red peppers. Here's the presentation. In the future, I gotta use either smaller quail (these are Texas size quail) or make the coffin bigger.


So, for the puff pastry dough, here are the ingredients:


Those are lemons there, not grapefruits. A friend gave me a bunch of Meyer lemons. They have great flavor. So, I juiced them all, made ice cubes of the juice so that there are small quantities available when needed.

3 cups of all-purpose flour
1 1/2 tablespoons sugar
1 1/2 teaspoons salt
2 teaspoons lemon juice
1/4 cup vodka (yes, vodka), chilled,
1/2 cup water, chilled
1/4 cup water, chilled

3 sticks (24 tablespoons) unsalted butter, chilled
2 tablespoons all-purpose flour

First thing is to combine the flour, sugar and salt. This is done in the food processor. Just put all those dry ingredients in it and pulse it for about 5 to 10 seconds.

Now, with the processor running, add the lemon juice, the vodka and the 1/2 cup of water in a slow and steady stream. Add the remaining 1/4 cup water as needed, 1 tablespoon at a time, until the dough comes together and no flour bits remain.

Turn the dough onto a sheet of plastic wrap and flatten into 6-inch square. Wrap tightly in plastic and refrigerate for about an hour.

On to the BUTTER SQUARE!

Lay butter sticks side by side on a sheet of parchment paper.


Now, dust this with the two tablespoons of flour.
Now place a second piece of parchment paper on top and gently pound the butter with your palms or with a rolling pin to softened it and incorporate the flour and roll it into an 8-inch square. Should look like:


Wrap the square in plastic wrap and refrigerate until chilled, about an hour.

After chilling the dough and butter square, roll the chilled dough into an 11-inch square on a lightly floured surface. Place the chilled butter square diagonally in the center, like this:
Fold corners of dough up over the butter square so that corners meet in the middle and pinch the dough seams to seal.. Using rolling pin, gently tap dough, starting from center and working outward, until square becomes larger and butter begins to soften. Gently roll dough into 14-inch square, dusting with extra flour as needed to prevent sticking. This should then look like this: 


Now fold the dough into thirds like a business letter, then fold the rectangle in thirds to form a square, like this:

Wrap dough in plastic and let rest in refrigerator for 2 hours.

Repeat this twice (yes, twice!). That is, roll it out on a floured surface into a 14 inch square, fold like a business letter and then fold into a square and then wrap in plastic and then refrigerate for 2 hours. Then repeat.

This amount of puff pastry dough should be enough for 10 coffins. So, I froze half of it by wrapping in plastic and then in aluminum foil. Should keep about six months.

To make the coffins, first preheat the oven to 400 degrees.

Roll out the dough on a floured surface, large enough to cut out the coffins. I first tried a 5-inch circle for each coffin. Next time it will be a 6-inch or 7-inch circle. (Texas quail are big!)

Cut out these large circles and place on a parchment paper lined baking sheet.

Now, cut a smaller circle (I tried a 3-inch in the 5-inch circle) but do not cut all the way through! You want to make a lid for the coffin.

Bake for 22 minutes or until puffed and golden. Carefully lift out the lid to create the coffin and a lid. Place on a wire rack to cool.


This entry is focused on the puff pastry. Nailed it! Just need to make them bigger.

Now, to round things out, here's what I did for the quail and the sauce.

First the quail - like I said, a simple recipe. I will try the Babette's feast recipe for it later. What I did what dry each quail and then stuffed with apple slices. I then coated each with dijon mustard and seasoned with salt and pepper. Then, into the stove top smoker for 25 minutes. Then, into the broiler for 4 minutes to crisp up the skin.

For the sauce - another simple recipe. Took a good handful (about 1/2 cup) of golden raisins and put them in a sauce pan with a couple of teaspoons of lemon juice and about 8 ounces of raspberry jelly. Heated that until it started to boil, turned off the heat and then added 1/2 stick (1/4 cup) of butter that was cut up into 1/2-inch cubes.

It was fantastic.